Technical Resources
Educational Resources
APM Integrated Experience
Connect with Us
Microsoft provides you with excellent built-in logging providers for writing logs to various destinations, but it’s sometimes too difficult to analyze issues when using the default providers.
Let’s say you have 10 Windows web servers hosting a web application. If you write errors to each server’s Windows Event Log, it can be extremely time-consuming to find out which server is having issues. In many cases, one server could have a hardware issue, or synchronization between software versions isn’t executed properly. If you write to the Windows Event Log, administrators need to go back into each web server and review individual logs on each server. This can get tedious for administrators of large web farms.
The alternative is to log errors to files. If you wanted to write logs to files, you’d need to create your own layer designed to log errors to a specific repository. Instead of relying on file I/O classes, you can incorporate a free logging library. These logging libraries support multiple outputs (like syslog and HTTP) and can show you the time the event happened, the type of error (DEBUG vs. ERROR vs. WARNING), the exception message, and the location of the error.
You can even log to a central location off the production server to reduce overhead, improve security, and aggregate all your logs in one place (or feed them to a dedicated log management solution) to allow for cohesive analytics and central archiving. There are several libraries available on the market, but only a few are considered reliable and truly convenient for the coder.
In this section, we’ll cover three common logging libraries capable of making logging .NET information much more convenient. In most .NET teams, the three main choices for external libraries are NLog, log4net, and Serilog. You can decide for yourself which logging libraries to use, but the ones we discuss are the most convenient to get started. We discuss the installation and usage of Serilog in the .NET Logging Basics section of this guide.
log4net is one of the most common external logging services available to .NET developers. The developers for log4net promise you can have logging integrated with your application within minutes, and it’s true—setup is easy. log4net is available in NuGet, so it’s just as easy to install as it is to code. For installing log4net in an ASP.NET Core application, open NuGet Packages in Visual Studio, type “Microsoft.Extensions.Logging.Log4Net.AspNetCore” in the search bar, and select the package. Click “Install,” and NuGet installs the appropriate DLLs into your project.
log4net can write logs to several destinations, which—according to its own terminology—are called “appenders.” Some common appenders you can use are as follows:
You can configure log4net through an XML configuration file. Create a file named log4net.config and add the following code to it:
<log4net>
<root>
<level value="ALL" />
<appender-ref ref="RollingFileAppender" />
</root>
<appender name="RollingFileAppender" type="log4net.Appender.RollingFileAppender">
<appendToFile value="true" />
<file value="./logs/logfile.txt" />
<rollingStyle value="Date" />
<datePattern value="yyyyMMdd-HHmm" />
<layout type="log4net.Layout.PatternLayout">
<conversionPattern value="%date %-5level %logger.%method [%line] - MESSAGE: %message%newline" />
</layout>
</appender>
</log4net>
With the configuration, we’ll instruct log4net to write a new log file to the specified folder every minute. Since we’ve set the minimum logging level in the configuration to ALL, log4net will log everything to the files. Other log levels you can use are DEBUG, INFO, WARN, ERROR, FATAL, and OFF (which disables logging).
Finally, we’ll use the configuration to set up our logging provider:
builder.Host.ConfigureLogging(loggingBuilder =>
{
loggingBuilder.ClearProviders();
loggingBuilder.AddLog4Net("log4net.config");
});
You can now write logs as usual using the ILogger interface:
public class IndexModel : PageModel
{
private readonly ILogger _logger;
public IndexModel(ILogger<IndexModel> logger)
{
_logger = logger;
}
public void OnGet()
{
_logger.LogInformation("This is a custom message from the Loggly Guide");
_logger.LogError(new Exception("Error"), "Dummy error from the Loggly Guide");
}
}
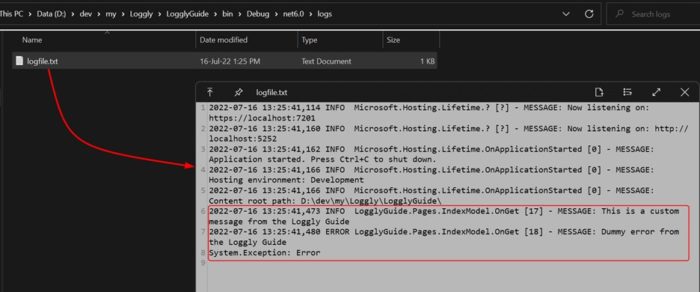
Run the application and allow it to write some logs. You’ll find the logs available as text files in the folder you specified in the configuration. The following screenshot presents the logs written in one such file:

You can see with the .NET pluggable logging architecture, adding or removing logging providers is straightforward. The advantage of using log4net over the built-in providers is the number of destinations available to send your logs and the extensibility it provides with configurations.
When logging exceptions, each exception class has its own properties you can use to print direct errors triggered from your code. When you print full reports of your errors, just remember it can be more difficult to parse and read, especially when you have several servers to review. A log management solution can make analyzing these logs easier.
NLog is just as easy—if not easier—than log4net. Like log4net, you get access to various targets where you can send your logs. NLog is driven by an XML configuration as well. To get started with integrating NLog to your ASP.NET Core application, install the following NuGet packages to your project:
Install-Package NLog.Web.AspNetCore
Install-Package NLog
Next, create a file named nlog.config in the root of your project:
<?xml version="1.0" encoding="utf-8" ?>
<nlog xmlns="http://www.nlog-project.org/schemas/NLog.xsd"
xmlns:xsi="http://www.w3.org/2001/XMLSchema-instance"
autoReload="true">
<!-- enable asp.net core layout renderers -->
<extensions>
<add assembly="NLog.Web.AspNetCore"/>
</extensions>
<!-- the targets to write to -->
<targets>
<target xsi:type="ColoredConsole" name="consoleTarget" layout="${longdate} ${uppercase:${level}} ${message}" />
</targets>
<!-- rules to map from logger name to target -->
<rules>
<logger name="*" minlevel="Info" writeTo="consoleTarget" />
</rules>
</nlog>
The settings configure NLog to write logs in color to the console. Files, database, email, and Windows Event Log are some of the many other targets you can configure for writing logs. Finally, we specified the format for our log messages in the template and the minimum log level that should be logged.
To set up the IHostBuilder to use NLog as the logging provider, use the following:
builder.Host.ConfigureLogging(loggingBuilder =>
{
loggingBuilder.ClearProviders();
loggingBuilder.AddNLogWeb("nlog.config");
});
The following screenshot shows the output with some of the logs written to the console, including the custom logs we wrote from the application:

Last updated: 2022